まずは、肝心の鍵ファイルの作成
Linux上のopensslコマンドを利用しました。
1.Private Keyの作成
2048bitでhoge.keyというファイルを作成しました
$ openssl genrsa -des3 -out hoge.key 2048

openssl genrsa -out ozawa.key 2048
Generating RSA private key, 2048 bit long modulus
......................................................+++
.........................................................................+++
e is 65537 (0x10001)
Enter pass phrase for ozawa.key:
Verifying - Enter pass phrase for ozawa.key:
パスフレーズなしにしたい場合は-des3を抜けばOK 2.Certificate Signing Request (CSR)の作成
openssl req -new -key hoge.key -out hoge.csr
You are about to be asked to enter information that will be incorporated
into your certificate request.
What you are about to enter is what is called a Distinguished Name or a DN.
There are quite a few fields but you can leave some blank
For some fields there will be a default value,
If you enter '.', the field will be left blank.
-----
Country Name (2 letter code) [GB]:JP
State or Province Name (full name) [Berkshire]:Tokyo
Locality Name (eg, city) [Newbury]:Tokyo
Organization Name (eg, company) [My Company Ltd]:company
Organizational Unit Name (eg, section) []:
Common Name (eg, your name or your server's hostname) []:hoge
Email Address []:

Please enter the following 'extra' attributes
to be sent with your certificate request
A challenge password []:
An optional company name []:
住所やら所属やら聞かれるけれど適当に入力 3.Self-Signed SSL Certificatの作成 アップロードするのはこのファイルです。
openssl x509 -req -days 3650 -in hoge.csr -signkey hoge.key -out hoge.crt
Signature ok
subject=/C=JP/ST=Tokyo/L=Tokyo/O=company/CN=hoge
Getting Private key
予め、AWSのアカウントはIAM Foxに登録されていて、IAMユーザが作成されていることを前提にします
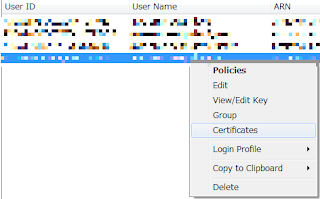
4.IAM FoxでSigning Certificateを追加したいユーザを右クリックしてCertificateを選択

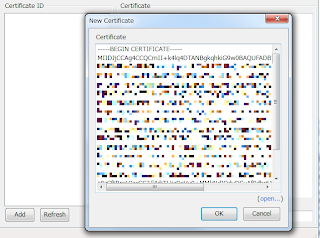
5. Addボタンを押してNew Certificateにhoge.crtの中身を入力してOKボタン

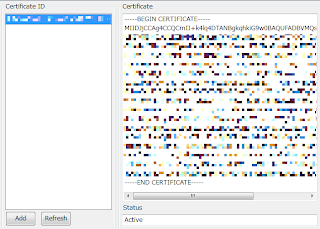
6.追加されると、自動的に名前が付与され、StatusがActiveになります

Private Key Fileにあたるのがhoge.key
X.509証明書(X.509 Certificate)にあたるのがhoge.crt
になります。
0 件のコメント:
コメントを投稿